Learning about image compression: chroma subsampling, with interactive demos
Partly AI-generatedClaude Opus 5.5
- Direction
- Me I led the investigation: I chose what to test, ranked the images by eye, and made the final choices.
- Images and numbers
- Tools used by AI Every image, crop and score comes from standard software: the JPEG, WebP, AVIF and JPEG XL encoders, ffmpeg, SSIMULACRA 2 and Python's image libraries, run by scripts Claude wrote. None of it is AI-generated.
- Tools and demos
- AI Claude wrote the code for the comparison tool, the interactive demos and the image host. I tested them and asked for changes.
- Code in the post
- AI Claude wrote the nginx configuration, the Python snippet and the command. I haven't reviewed them, and each is labelled where it appears.
- First draft
- AI Claude wrote the first draft.
- Editing
- Me I edited the draft into the final version.
- Review
- AI Claude reviewed my version and fixed mistakes.
I run a small image host, mostly for posting game screenshots to a forum, where a PNG of several megabytes needs a much smaller file size to be web friendly. I wanted to do some research into the best image compression method, but I fell down a rabbit hole.
I went much deeper into researching this than I expected. I built tools and demos to test theories and explain concepts to myself. I ended up learning about how images store colour, and why the default method was limiting my image quality. In this post, I explain my testing and demo the tools I built.
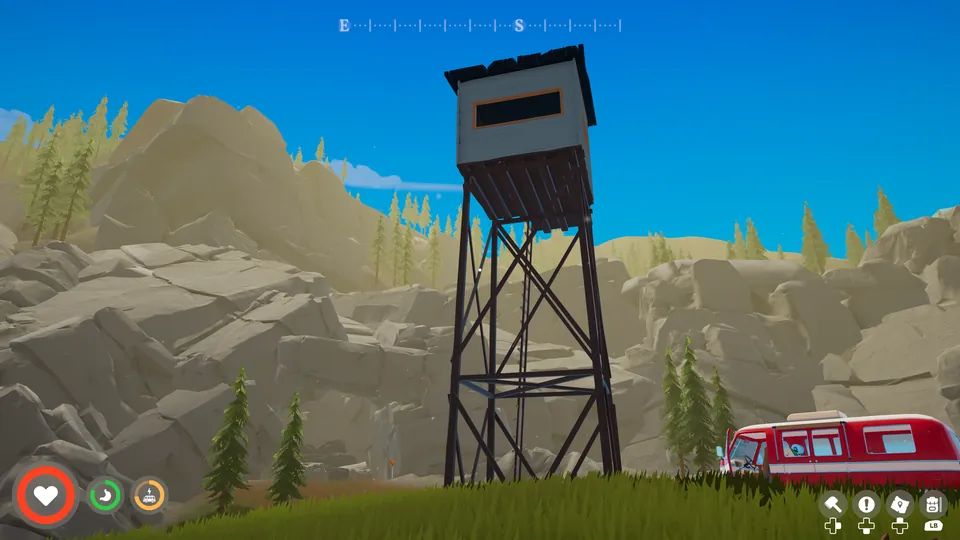
The test image throughout is a 4K screenshot from Outbound, a cosy camper-van game by Square Glade Games.
Measuring what you can see
I started by manually comparing compressed images side by side, but the amount of possible options made it difficult. I wanted to find a programmatic scoring method that could replace my manual comparisons.
The standard in the field was SSIM, the structural similarity index from 2004. It's included in ffmpeg which made it handy.
I also found SSIMULACRA 2. It isn't widely known, but is part of the reference JPEG XL library.
To test the two scores, I ranked four files by eye and compared my ranking with theirs. The files are different sizes, so this isn't a contest between formats. The question is only whether each score agrees with what I see.
| File | Size | My eye | SSIM | SSIMULACRA 2 |
|---|---|---|---|---|
| JPEG XL default | 214.8 KB | 1st | 3rd | 1st |
| AVIF quality 60 | 96.8 KB | 2nd | 1st | joint 2nd |
| WebP quality 82 | 119.9 KB | 3rd | 2nd | 4th |
| JPEG quality 82 | 198.9 KB | 4th | 4th | joint 2nd |
Here are those images next to each other. Pressing on them will show the original so it's easier to compare.

JPEG XL, default
eye 1st · SSIM 3rd · SSIMULACRA 2 1sthold to compare

AVIF quality 60
eye 2nd · SSIM 1st · SSIMULACRA 2 joint 2ndhold to compare

WebP quality 82
eye 3rd · SSIM 2nd · SSIMULACRA 2 4thhold to compare

JPEG quality 82
eye 4th · SSIM 4th · SSIMULACRA 2 joint 2ndhold to compare
JPEG XL looked best to me by far. It barely changes at all, though it is also the biggest file. SSIM didn't agree. It ranks JPEG XL third, which seems grossly incorrect to me.
SSIMULACRA 2 agreed that JPEG XL was best. It isn't perfect either: it rates JPEG as highly as AVIF, and WebP last. But it got closest to my eye, so every score in the rest of this post comes from SSIMULACRA 2.
Comparing every setting side by side
To streamline comparisons, I built a tool. It runs 35 settings across the four formats on the test image, and shows each result as five crops of different parts of the frame. Holding down on a result swaps the original into the same spot, which shows differences far better than looking side to side. Below is a sample of the tool you can try.
Going through the settings, most behaved as expected. Higher quality meant a bigger file and a better score. One kind didn't. JPEG and AVIF have an option for something called full-resolution colour, and with it, a lower quality setting gave a better image in a smaller file.

AVIF quality 70
default colour
128.8 KB · score 75.3hold to compare

AVIF quality 60
full-resolution colour
112.4 KB · score 76.9hold to compare
The left image has a dull halo around the thin blue trim and dots. The right image is clearly much more crisp, and it's 13% smaller.
At first I thought it was a mistake. A higher quality setting should buy a better image with more bytes, not the other way round. So I dug into what was going on.
YUV colour
JPEG, WebP and AVIF all do the same colour conversion by default. The image is converted from RGB into one brightness channel and two colour channels, known as YUV. (Strictly it's YCbCr, but encoder settings call it YUV.)
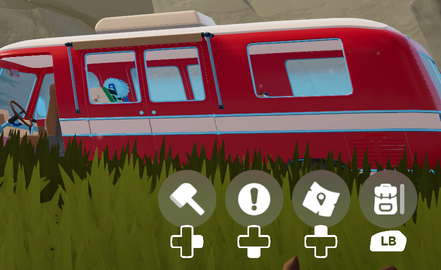
Original
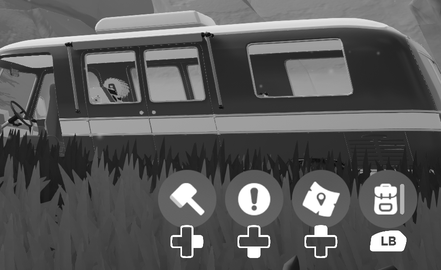
Brightness
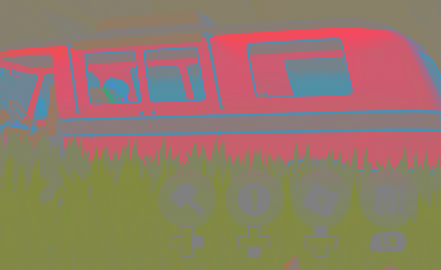
Colour
It uses YUV so that the resolution of the colour can be reduced independently of the brightness channel. It's a clever technique to reduce file size by optimising to how the human eye works. It's more sensitive to brightness than colour, so reducing colour resolution isn't too noticeable.
The method to reduce colour resolution is called chroma subsampling, which is typically shown as 4:4:4, 4:2:2, or 4:2:0. The numbers describe a reference block 4 pixels wide and 2 rows high. The first number is that width, so it's always 4. The second number is how many colours the top row keeps: 4 means each pixel gets its own colour, 2 means the 4 pixels share 2 colours. The third number is how many new colours the bottom row adds, and 0 means it reuses the top row's colours.
So 4:4:4 keeps colour for every pixel, 4:2:2 keeps one colour for each side-by-side pair, and 4:2:0 keeps one colour for each 2×2 square. On top of the colour, the brightness value is added, so even though the colour values may be the same, the pixels can still look different by varying their brightness.
That's a lot to get my head around, so I built a visual demo.
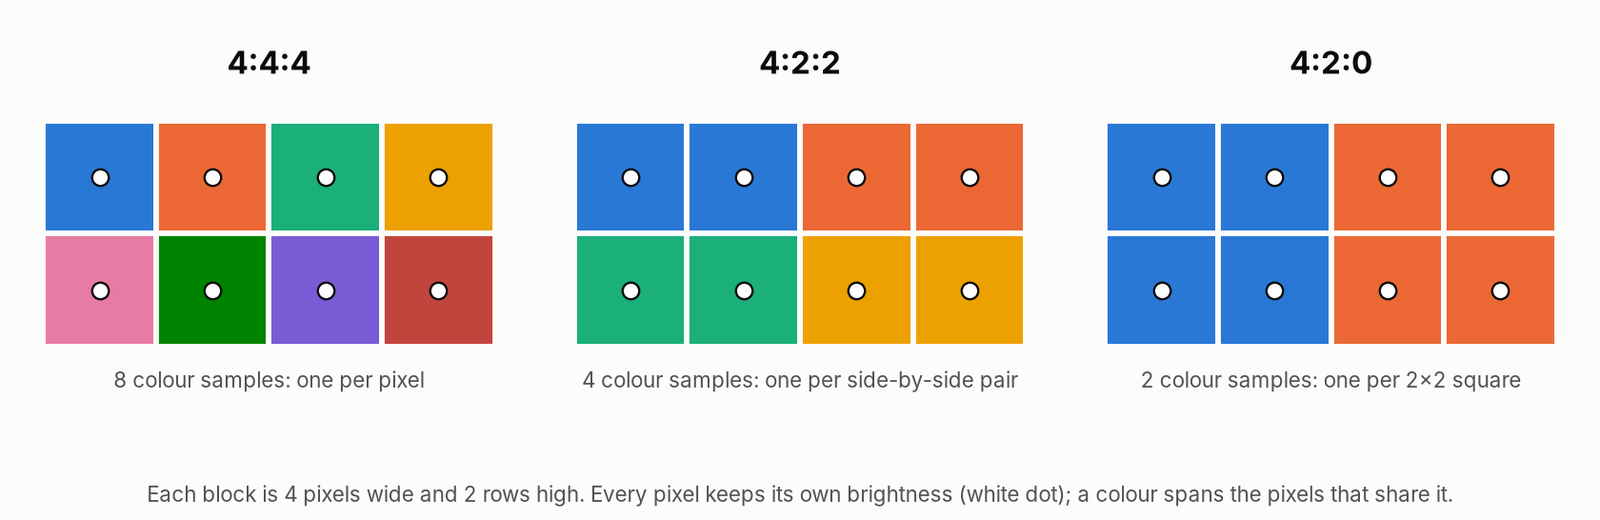
JPEG and AVIF use 4:2:0 by default, but both can be set to 4:4:4. Lossy WebP is always 4:2:0. JPEG XL keeps colour at full resolution.
Here is a comparison of the colour channels at full resolution (4:4:4) and half resolution (4:2:0).

Colour, full resolution
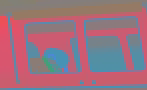
Colour, half resolutionhold to compare
When the image is displayed, the half-resolution colour channels are recombined with the full-resolution brightness channel. Most of the picture looks identical. A difference map shows how much each pixel has changed from the original.
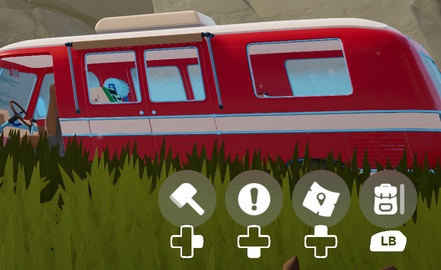
Colour halved, recombinedhold to compare
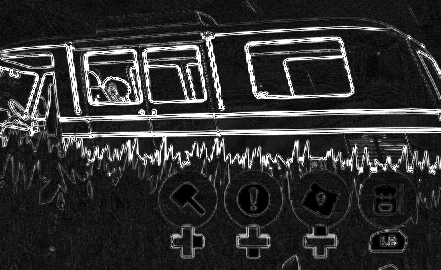
Difference × 6
Notice that the white icons on the bottom right don't change nearly as much as the van edges. The icon edges are changes in brightness rather than colour, from white to grey, so they are stored in the full-resolution brightness channel.
To see how much halving the colour costs on its own, I left compression out entirely. I converted the test image from RGB to YUV and straight back, and scored the result against the original.
| Step | Score |
|---|---|
| RGB to YUV and back, 4:4:4 | 92.1 |
| RGB to YUV and back, 4:2:0 | 79.9 |
| JPEG at its highest quality, 4:2:0, 918 KB | 80.1 |
| JPEG at its highest quality, 4:4:4, 1.49 MB | 92.1 |
The score falls to 79.9 before anything is compressed. That's a ceiling: with half-resolution colour and the ordinary conversion, standard JPEG, WebP and default AVIF can never score much above 80 on this image, however high the quality. JPEG at its highest quality lands right on it.
That explains the surprise from the comparison tool. The full-resolution 4:4:4 colour option keeps the detail that 4:2:0 removes, and no amount of extra quality can bring it back.
What I chose
Now I understood why full-resolution colour was looking better, I wanted to choose a full-resolution colour image format, but I needed to take into account browser support. JPEG XL has the patchiest support of them all. AVIF with full-resolution colour needs a less common variant of the AV1 codec it's built on, called the High profile, and I couldn't test that on an iPhone or a Mac. They were my top two choices, and neither worked in every browser.
The answer was not to choose one format. Every upload is now stored in four formats under one .jpg URL. When a browser fetches the image, it sends an Accept header listing the formats it can show. The host reads that list and sends the best copy the browser says it can show from the same URL. It's the same method CDNs such as Cloudflare and Cloudinary use.
Here is a demo of that in action. The URL of the image below ends in .jpg, but the image you receive depends on your browser support.
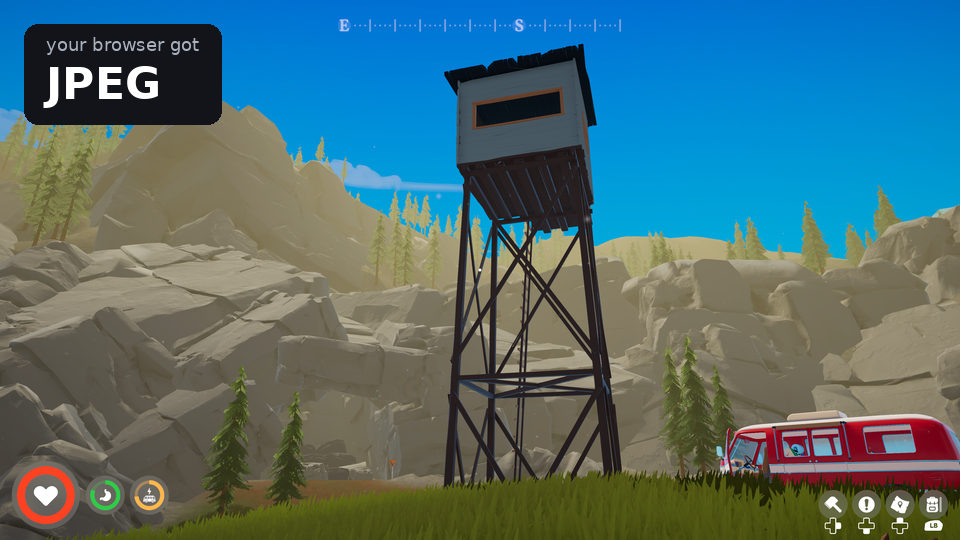
negotiated.jpg.
| Copy | Size |
|---|---|
| AVIF | 41.4 KB |
| JPEG XL | 49.5 KB |
| WebP | 49.6 KB |
| JPEG | 89.8 KB |
Now I could use the format I wanted without compromising on browser support. I had to rank the formats in order of preference, so I tested each one across its quality settings.
The chart needs JavaScript. The four copies the host serves are in the table below.
| Rank | Copy | Size | Score | Who gets it |
|---|---|---|---|---|
| 1 | AVIF quality 60, full-resolution colour | 112 KB | 76.9 | Browsers that list AVIF, apart from Apple's: Chrome, Firefox, Android |
| 2 | JPEG XL distance 2.5 | 133 KB | 78.5 | Browsers that list JPEG XL: Safari 17 and later |
| 3 | WebP quality 82, sharp YUV | 128 KB | 72.9 | Browsers that list WebP: Safari 16 |
| 4 | JPEG quality 82, full-resolution colour | 260 KB | 79.7 | Everything else. Every browser can show it |
AVIF comes first because it's the smallest. At the same size, JPEG XL scores about the same, so a browser that lists both gets the fewer bytes. Apple's browsers never get AVIF, because the High profile is the part I couldn't test. That covers every browser on an iPhone, since they all use Apple's engine underneath.
The whole choice is a few lines of nginx configuration. The host keeps every copy under the same name with a different extension:
AI-generated code, not reviewed
map $http_accept $accepts_avif { default 0; "~*image/avif" 1; }
map $http_accept $accepts_jxl  { default 0; "~*image/jxl"  1; }
map $http_accept $accepts_webp { default 0; "~*image/webp" 1; }

# Every Chromium browser says "Chrome/"; every Apple browser says "AppleWebKit" without it.
map $http_user_agent $apple_webkit { default 0; "~Chrome/" 0; "~AppleWebKit" 1; }

# First match wins: AVIF unless Apple, then JPEG XL, then WebP, then JPEG.
map "$accepts_avif$apple_webkit$accepts_jxl$accepts_webp" $best {
    "~^10"     avif;
    "~^..1"    jxl;
    "~^...1$"  webp;
    default    jpg;
}
map "$best:$uri" $negotiated {
    "~^(?<ext>avif|jxl|webp):(?<stem>/\w+)\.jpg$"  "$stem.$ext";
    default                                         $uri;
}

location ~ \.jpg$ {
    add_header Vary "Accept, User-Agent" always;
    proxy_pass http://127.0.0.1:8000$negotiated;
    proxy_intercept_errors on;
    error_page 404 = @jpeg;        # that copy doesn't exist: send the JPEG
}
location @jpeg { proxy_pass http://127.0.0.1:8000$uri; }
The Vary header tells any cache along the way that the same URL can return different files. The fallback means older uploads, which only have a JPEG, keep working.
Opening an image in its own tab is different. The browser sends the header it uses for web pages, and Firefox and Safari don't list image formats there, so a link opened on its own got the JPEG. For those requests only, the host goes by the browser's version instead: Firefox 93 and later get AVIF, and Safari 17 and later get JPEG XL.
I tested it in current Chromium, Firefox and WebKit, the engine behind Safari, and in older browser versions. Chromium and Firefox received AVIF, and WebKit received JPEG XL. Firefox 92, the last version without AVIF, received WebP, and Firefox 93, the first with it, received AVIF.
WebP
WebP is the copy for older Safari. It doesn't have a full-resolution colour option, but it gives better results with sharp YUV, an option in libwebp, Google's WebP library. Instead of halving the colour once and moving on, sharp YUV checks its own work. It scales its half-resolution colour back up, recombines it with the brightness, and compares the result with the original. Then it adjusts both brightness and colour to close the gap, for up to four passes. The colour is still at half resolution, but far less is lost in halving it.

WebP q82hold to compare

WebP q82, sharp YUVhold to compare

its error × 4

its error × 4
At quality 82, sharp YUV added 7% to the size and 2.7 points to the score. It lifts the ceiling too: at its highest quality, WebP with sharp YUV scores 85.9, where plain WebP stops at 78.3. The output is ordinary WebP, so it costs nothing in compatibility.
There is one trap. Python's Pillow library, the usual way to write WebP from a script, has no sharp YUV option, and it doesn't complain if you pass one. With Pillow 12.3, these two files come out byte-for-byte identical:
AI-generated code, not reviewed
im.save("a.webp", quality=82, method=6)
im.save("b.webp", quality=82, method=6, use_sharp_yuv=True)
To get sharp YUV you need cwebp, libwebp's own command-line encoder:
AI-generated code, not reviewed
cwebp -q 82 -m 6 -sharp_yuv -metadata none image.png -o image.webp
Try it on your own images
Everything here is available in the compression-lab repository. That includes the comparison tool, with all 35 settings and all five regions, which you can also open here on this blog without installing anything.
What I learned
- Check whether your format stores colour at half resolution. If you can keep full-resolution colour, do that before spending a single byte on higher quality.
- You don't have to choose one format. Store several, and let each browser's
Acceptheader say which it can show. - If you're stuck with WebP, use sharp YUV, through
cwebprather than Pillow.